
Because the tight 3mm joint turns every install error into a visible step, leveling clips that hold tiles in one plane while the adhesive cures are the real fix.
What Makes Rectified Tile Different from Calibrated Tile
Rectified and calibrated tile are both porcelain — the difference is what happens after firing. Rectified tile is mechanically ground on all four edges so every piece is dimensionally identical with square, sharp corners. Calibrated tile is sized but not edge-ground; its dimensions and edges vary within the manufacturer's tolerance, and edges can bow or belly slightly.
That grinding is what lets rectified tile sit in a tight 3mm (1/8″) grout joint — the crisp, contemporary look most large-format projects are specced for. But the same tight joint removes the buffer that wider joints provide. On a calibrated floor with 5mm joints, a 0.5mm height difference between two tiles is visually absorbed. On a rectified floor, that 0.5mm step is a hard shadow line at every tile. This is the core problem: rectified tile makes lippage more visible, not less likely. Getting it flat is the whole job — which is exactly what a tile leveling system manufacturer engineers for.
Bottom line: rectified tile's tight 3mm joints turn every install error into a visible step. The ANSI A108.02 allowance is 1/32″ (0.8mm) of lippage — roughly the thickness of a credit card — and any step bigger than that on a rectified floor reads as a defect under raking light. The fix is not a more expensive tile; it is leveling clips that hold every tile in the same plane while the adhesive cures.
3 Root Causes of Lippage on Rectified Tile
Lippage on rectified tile is almost never one mistake — it is the accumulation of three, each measured in fractions of a millimeter:
- ① An unlevel substrate. ANSI A108.02 requires the subfloor to be flat to 1/8″ in 10 ft before tiling. A dip under a tile edge that big is roughly double the acceptable lippage before a single tile is even set. Self-leveling underlayment, not more adhesive, is the fix.
- ② An uneven adhesive bed. A notched trowel leaves ridges; if the tile is not firmly bedded and back-buttered, those ridges create hollow spots and dips. ANSI A108.5 calls for 80% mortar coverage in dry areas, 95% in wet areas and exteriors — and the edge of a large-format tile is exactly where coverage fails first. A 1mm dip under a rectified edge becomes a 1mm lippage step.
- ③ Tile warpage plus install error. Rectified grinding shrinks — but does not eliminate — tile bowing (ASTM/ISO flatness classes still vary by factory). Stack that residual warpage on top of the first two causes and a "barely out of spec" floor is visibly lippage. This is the one cause a tile leveling clips system actually removes, by forcing every edge into the same plane.
Rectified Tile Installation and Lippage: The 1/32″ Tolerance
There is a written answer, and it is stricter than most installers realize. ANSI A108.02 sets the allowable lippage for pressed floor and porcelain tiles (all sizes) with grout joints from 1/16″ to under 1/4″ at 1/32″ (0.8mm) — about the thickness of a credit card. For joints 1/4″ and wider, the allowance doubles to 1/16″ (1.6mm), roughly the thickness of a penny. For rectified tile specifically, lippage should not exceed 1/32″.
Two things make the real-world number tighter. First, tile warpage is added on top: total allowable lippage is installation lippage plus the tile's inherent warpage within its manufacturing tolerance — so a nominally compliant floor can reach 2mm at the worst joint. Second, perception: under side light, most people notice a step above 0.5mm even when it is technically in spec. A floor that "passes" the numbers can still look wrong. This is why serious rectified programs spec a tile leveling system wholesale supplier into the tender — the tile is cheap; the rework is not.
Why 3mm Joints Force You to Level
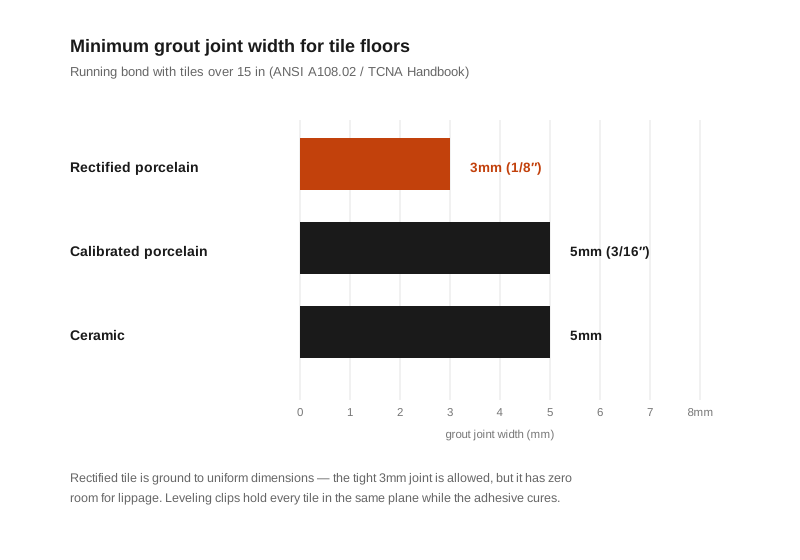
The joint itself is the reference line. A 3mm grout line is narrow enough that the eye locks onto it — and onto any height change across it. Widening the joint to 5mm (as calibrated and ceramic tile require) scatters that shadow; the tight rectified joint concentrates it. You cannot un-see lippage on a 3mm joint.
That is where the leveling system earns its place. Tile leveling clips slide under tile edges at the corners — four per tile, which works out to roughly 11 clips/m² on a 60×60 format — then tile leveling wedges are driven through the clips to pull adjacent edges into the same plane. The assembly holds while the adhesive cures (typically 24 hours); the clips snap off flush below the tile surface, and the wedges are reusable across roughly 80 cycles of the day's work. For large-format work a spin doctor tile leveling system does the same job with a twist-to-level cap that needs no pliers. Every option has the same goal: eliminate the height difference that the tight rectified joint otherwise exposes.
Rectified Tile Installation, Step by Step
A lippage-free rectified floor is a sequence of checks, not a single technique:
- Verify the substrate — flat to 1/8″ in 10 ft (ANSI A108.02). Level and prime before any tile is set.
- Trowel a full adhesive bed — 8–10mm notched trowel, and back-butter large-format tile for 80% dry / 95% wet coverage (ANSI A108.5).
- Set the first tile, then clip each corner — the clip base goes under the tile edge where the next tile will meet it.
- Lay the next tile and insert the wedge — drive the wedge through the clip until both edges sit flush; use pliers for consistent pressure on large-format work.
- Check with a straightedge and level before the adhesive skins over.
- Cure 24 hours, then tap clips off sideways — collect the wedges for reuse.
One layout rule matters more than it looks: for running bond (brick pattern) with tiles over 15 in on any side, keep the offset at 33% or less unless an approved mock-up proves otherwise — larger offsets multiply lippage from tile curvature. With rectified tile you can push toward 50% only when the tile is genuinely flat and the floor is leveled.
Before You Order: What to Specify for a Rectified Program
Lippage prevention starts in procurement, not on the jobsite. Three specifications protect a wholesale buyer ordering for resale or for their own installers:
- Demand a real rectified class. "Rectified" is a marketing term until it is tied to a dimensional tolerance — spec tiles ground to a flatness/rectification class with edge-to-edge consistency verified on a sample mock-up before the container ships.
- Match the system to the joint. Clip thickness should equal your specified joint width (1.5 / 2 / 3mm are the common rectified joints). A tile leveling system wholesale supplier can pair clips, wedges, and pliers into one SKU so installers are not piecing together mismatched brands on site.
- Validate with a mock-up. The 1/32″ rule is easy to state and hard to hit. Order a trial quantity, install a 2×2m panel, and measure lippage with a straightedge and feeler gauge before committing to a container.
Wholesale clips from a China factory run $0.70–0.85 per bag of 100 at the gate (FOB Ningbo), with wedges at $0.80–1.00 per bag — a rounding error next to the cost of tearing out a lippage-failed rectified floor, which starts at real labor and tile replacement. For OEM or private-label programs, the same system can be branded for your market.
Frequently Asked Questions
How much lippage is acceptable on rectified tile?
Per ANSI A108.02, allowable lippage for pressed floor and porcelain tiles with grout joints from 1/16″ to under 1/4″ is 1/32″ (0.8mm) — about the thickness of a credit card. For joints 1/4″ and wider it is 1/16″ (1.6mm). For rectified tile specifically, lippage should not exceed 1/32″. Tile warpage is added on top, so the total at the worst joint can approach 2mm.
What size grout joint for rectified tile?
A minimum of 3mm (1/8″) for rectified tile in running bond with tiles over 15 in; calibrated (non-rectified) tile needs 5mm (3/16″), and ceramic no less than 5mm. Large-format porcelain — rectified or not — should not go below 3mm. A 3mm joint is only safe if the tile is perfectly flat and leveled.
Can tile leveling clips fix lippage on large-format rectified tile?
Yes. Leveling clips at four corners per tile pull adjacent edges into the same plane while the adhesive cures — roughly 11 clips/m² for a 60×60 format. Clips snap off below the surface after curing, and the wedges are reusable. This is the only fix that removes the height difference itself rather than masking it.
Do I still need leveling if my tile is rectified?
Yes. Rectified tile removes dimensional variance from the tile, but not the other three sources of lippage: substrate flatness, adhesive bed consistency, and residual tile warpage plus install error. And because rectified tile uses tight 3mm joints, it has the least room for error of any format — leveling matters more, not less.